
TL;DR
Moving your rig away from your workspace is the most effective noise reduction. Proper placement of mic and acoustic treatment, combined with ventilation, makes a small closet studio both quiet and functional.
Ever wondered why some home studios sound more professional than others? The secret often isn’t fancy gear or thick foam—it’s where you put your gear and how you treat that space. If your setup lives in a tiny closet, you’re already halfway there to a quiet, effective studio. But the trick is knowing what really makes a difference. If your setup lives in a tiny closet, you’re already halfway there to a quiet, effective studio. But the trick is knowing what really makes a difference.
This isn’t about slapping foam on walls and calling it a day. It’s about smart placement, proper acoustic treatment, and understanding what noise you’re fighting—airborne or structure-borne. Get these right, and your closet can become a surprisingly good space for recording, with less noise bleed and fewer echoes. Ready to turn that cramped closet into your secret weapon?
Acoustic dampening
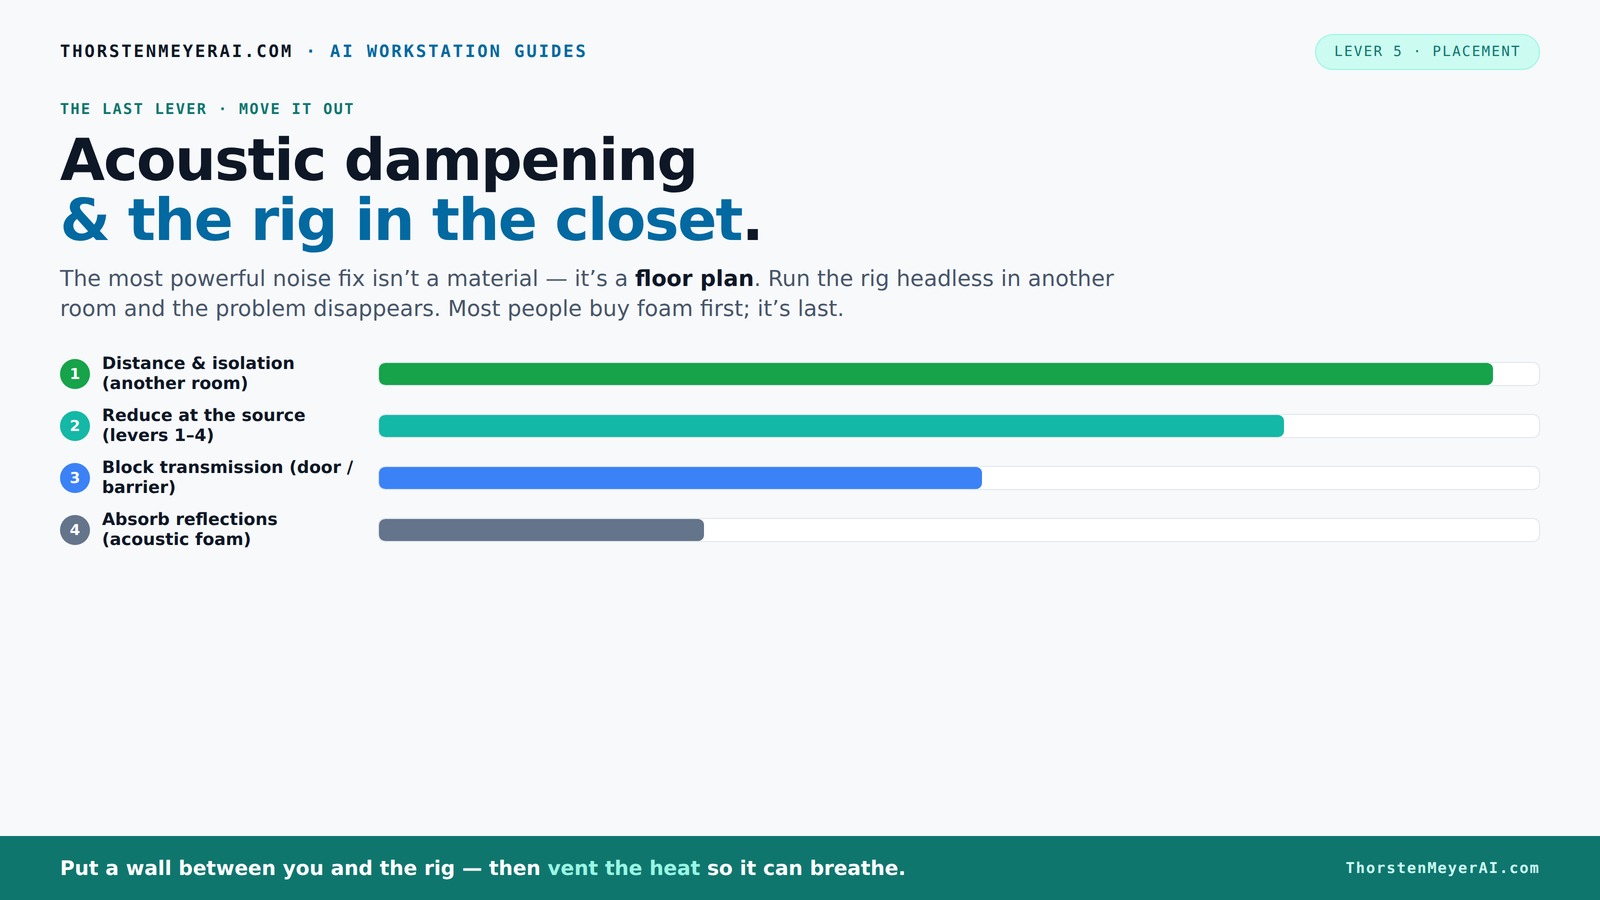
& the rig in the closet.
The most powerful noise fix isn’t a material — it’s a floor plan. A rig you can’t hear because it’s in another room beats any amount of foam. Tap the approaches in Part 1 to see what actually works.
(another room)
(levers 1–4)
(door / barrier)
(acoustic foam)
Contain the noise, not the heat
Key Takeaways
- Moving the rig into another room or closet is the most effective noise reduction method.
- Proper ventilation is essential when placing a heat-generating machine in an enclosed space.
- Treat the surfaces directly in front of and behind the mic for the best acoustic results.
- Sealing gaps around the door dramatically reduces sound leakage. Gaps around the frame, hinges, or keyhole act like open windows for sound waves. For example, I used weatherstripping and acoustic sealant around my closet door, then added a heavy blanket as a door barrier. The result? A noticeable drop in leakages, and my neighbors no longer complain about the noise.
- Address low frequencies with bass traps in the corners—small rooms are bass magnets.

Focusound 52 Pack Acoustic Foam Panels 1" x 12" x 12" Sound Proof Foam Panles Soundproofing Noise Cancelling Wedge Panels for Home Office Recoding Studio with 300PCS Double-Side Adhesive
Soundproofing - Acoustic foam panels triangular grooves structure for better noise absorption, helps to reduce and absorb unwanted...
As an affiliate, we earn on qualifying purchases.
As an affiliate, we earn on qualifying purchases.
Why Moving the Rig Beats Any Foam — The Power of Distance
Distance is the single most effective way to cut noise. Think of it like turning down the volume by placing a wall between you and a loud speaker. When your AI rig is in another room or closet, the sound waves weaken before they reach your ears.
For example, I set up a high-powered GPU in a spare closet, and suddenly, my workspace was dead silent—even with the fans roaring. All I had to do was SSH into the rig, and I was working in a quiet zone. This approach works better than any foam panel because it physically removes the noise source from your listening area.
According to experts, reducing the distance between you and the noise source cuts sound transmission by over 80%. It’s simple, effective, and often overlooked. If you can, run your rig headless and access it remotely. Your ears—and your sanity—will thank you.

8 Pack - Bass Traps Acoustic Foam Corner, 8''x8''x12'' Black Bass Traps Corner Studio Foam, High Density and Fire-Proof Acoustic Panels Recording Studio Acoustical Treatments
Acoustic Principle- Bass Trap is a kind of sound absorbing structure specially used to absorb specific low-frequency standing...
As an affiliate, we earn on qualifying purchases.
As an affiliate, we earn on qualifying purchases.
The 'Rig in the Closet' Setup — Ventilation Is Your Best Friend and Worst Enemy
Placing a loud, heat-generating machine inside a closet is a brilliant way to dampen noise—but only if you treat it right. The biggest mistake? Sealing it shut and trapping heat. That’s like cooking your rig alive.
To keep it cool, you need ventilation—either passive vents or active exhaust fans. For instance, I installed a quiet exhaust fan in my closet setup, which kept temperatures stable even during intense workloads. Without airflow, your rig’s temperature soars, fans scream, and noise becomes worse. Check out this detailed guide on how to reduce heat and noise in an AI workstation. For instance, I installed a quiet exhaust fan in my closet setup, which kept temperatures stable even during intense workloads. Without airflow, your rig’s temperature soars, fans scream, and noise becomes worse.
For a more professional solution, consider a soundproof cabinet with ducted airflow and temperature control. These units combine acoustic insulation with active cooling, keeping noise down and heat out. Check out this detailed guide on [how to reduce heat and noise in an AI workstation](https://thorstenmeyerai.com/reduce-heat-noise-ai-workstation/).

2 Pack Studio Monitor Isolation Pads for Large Speakers Sound Insulation Studio Foam Prevents Vibrations Acoustic Speaker Isolation Pad High Density Fits Most Stands
Enhanced Sound Clarity: Saiqiang speaker isolation pads can reduce vibrations and resonance, providing cleaner, more accurate sound from...
As an affiliate, we earn on qualifying purchases.
As an affiliate, we earn on qualifying purchases.
Acoustic Treatment 101 for Tiny Closets: What to Cover First
In a small closet, the goal isn’t just to block sound—it's to control how it bounces around. Your first priority should be the surface directly behind the mic, then the walls and ceiling. This order maximizes your acoustic quality without overdoing it. Your first priority should be the surface directly behind the mic, then the walls and ceiling. This order maximizes your acoustic quality without overdoing it.
For example, I started with the wall behind my mic, adding a thick foam panel. Next, I covered side walls with absorption blankets and hung foam on the ceiling. This simple setup drastically reduced echo and made my recordings clearer.
Use a combination of materials based on what you’re treating: foam for high frequencies, bass traps for low-end issues, and blankets for quick fixes. Covering 20-30% of the surfaces with absorption is often enough for a small space, but full coverage can be necessary if echo persists.

Ultimate Portable Vocal Booth for Home Recording, Reduces Echo & Reverb
The Original & Best Portable Vocal Booth — Snap Studio created the category. Pop-up recording space for singers,...
As an affiliate, we earn on qualifying purchases.
As an affiliate, we earn on qualifying purchases.
Sealing the Door: The Weakest Link in Your Soundproof Chain
The door is the easiest point for sound to leak out of a closet studio. Gaps around the frame, hinges, or keyhole act like open windows for sound waves.
For example, I used weatherstripping and acoustic sealant around my closet door, then added a heavy blanket as a door barrier. The result? A noticeable drop in leakages, and my neighbors no longer complain about the noise.
To go further, you can install a solid core door, add a door sweep, or even hang a dense curtain for extra sound blocking. Remember, sealing gaps is often more effective than expensive foam panels.
Handling Low-Frequency Buildup in Tiny Spaces
Small, parallel-walled closets tend to trap bass frequencies, creating a boomy, muddy sound. This is because standing waves form easily in tight spaces. For example, I placed bass traps in the corners of my closet, which smoothed out the low end. Thick foam or specially designed bass traps absorb the low frequencies that standard panels miss. This is because standing waves form easily in tight spaces.
For example, I placed bass traps in the corners of my closet, which smoothed out the low end. Thick foam or specially designed bass traps absorb the low frequencies that standard panels miss.
If bass buildup is a problem, focus on corner treatment and consider thicker panels or dedicated bass traps. This makes your recordings sound clearer and more balanced across all frequencies.
Materials and DIY Tricks for a Budget Closet Studio
Budget-friendly options are plentiful. Foam panels, thick blankets, and rugs are your best friends. For example, I used leftover foam tiles and a heavy blanket to transform my closet into a usable vocal booth. Key materials include: acoustic foam for high frequencies, blankets for quick coverage, and rugs or carpets to tame reflections on the floor. Seal gaps with weatherstripping or acoustic caulk for better isolation. For example, I used leftover foam tiles and a heavy blanket to transform my closet into a usable vocal booth.
Key materials include: acoustic foam for high frequencies, blankets for quick coverage, and rugs or carpets to tame reflections on the floor. Seal gaps with weatherstripping or acoustic caulk for better isolation.
DIY tricks? Hang blankets from the ceiling, stack foam panels with tape, and use cardboard or plywood to reinforce weak spots. You don’t need to spend a fortune to get good results.
Frequently Asked Questions
What is the difference between acoustic dampening and soundproofing?
Acoustic dampening reduces echo and reflections inside a room, making the sound clearer. Soundproofing blocks sound from leaking out or coming in, sealing gaps and adding mass to walls or doors.
Where should I place foam or panels in a closet studio?
Start with the surface directly behind the mic, then treat side walls at reflection points, and the ceiling above your recording position. Covering about 20-30% of surface area usually makes a big difference.
Do I need bass traps in a closet booth?
Yes, if you notice boomy or muddy sound, especially in the low frequencies. Corners are perfect spots for bass traps, which help balance your sound and prevent bass buildup.
How do I stop sound from leaking through the door?
Seal gaps with weatherstripping, add a dense barrier like a blanket or heavy curtain, and consider replacing a hollow door with a solid core one. These steps cut down on leakage significantly.
How much material coverage do I need in a tiny closet?
Cover 20-30% of the walls with absorption panels or foam. For more control, aim for closer to full coverage, especially if echo persists or low-end sounds muddy.
Conclusion
Your closet can be a surprisingly good studio with the right placement, treatment, and ventilation. Focus on creating distance, sealing leaks, and treating the reflection points first. Then, enjoy a quiet, professional-sounding space without breaking the bank.
Remember, the best setup is one that balances noise control with practicality. A well-placed rig in a ventilated closet beats a noisy desk setup every time. So go ahead—turn that cramped closet into your secret recording weapon.